ペインター4には、シェイプス(Shapes)と呼ばれるベジエ曲線の編集ツールがあります。これを利用して絵を描くこともできます。ベジエ曲線の編集は慣れないとなかなか難しいですが、シェイプスで作った形はマスクに変換できるので、マスクを利用してエアブラシなどで彩色する場合はけっこう便利です。
使用ソフト:Fractal Design Painter 4.0.3
Painter 4 has a Bézier curve editing tool called Shapes. We can also use this to draw pictures. Editing Bézier curves is quite difficult if you are not used to it, but lines created with Shapes can be converted to masks, which is quite convenient when using masks to color with airbrush etc.
Software used: Fractal Design Painter 4.0.3

(a)
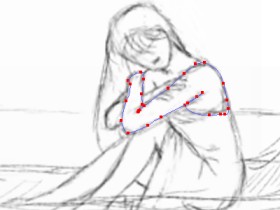
下描きを基に人物を幾つかのパーツに分けてベジエ曲線を作っていきます。
Based on the sketch, I divided the person in the sketch into several parts and created Bézier curves.

適当に描いた下描きに沿って、Quick Curve Toolでなぞっていくと、なぞった部分がベジエ曲線として編集できるオブジェクトすなわちシェイプス(Shapes)になります。
今作ったのは人物の左腕のシェイプです。
各シェイプは、塗りつぶし色(Fill)や、輪郭線(Stroke)の色や太さなどが指定できます。このシェイプは、下図(b)のように、肌色の塗りつぶしと茶色の輪郭線を、この後指定しました。 When I traced the sketch using the Quick Curve Tool, each traced part became an object that could be edited as a Bézier curve, that is "a Shape".
What I created here is the shape of the person's left arm.
For each shape, we can specify the fill color, stroke color, and thickness. For this shape, I specified a flesh-colored fill and a brown outline as shown in the image below (b).
Based on the sketch, I divided the person in the sketch into several parts and created Bézier curves.

適当に描いた下描きに沿って、Quick Curve Toolでなぞっていくと、なぞった部分がベジエ曲線として編集できるオブジェクトすなわちシェイプス(Shapes)になります。
今作ったのは人物の左腕のシェイプです。
各シェイプは、塗りつぶし色(Fill)や、輪郭線(Stroke)の色や太さなどが指定できます。このシェイプは、下図(b)のように、肌色の塗りつぶしと茶色の輪郭線を、この後指定しました。 When I traced the sketch using the Quick Curve Tool, each traced part became an object that could be edited as a Bézier curve, that is "a Shape".
What I created here is the shape of the person's left arm.
For each shape, we can specify the fill color, stroke color, and thickness. For this shape, I specified a flesh-colored fill and a brown outline as shown in the image below (b).

(b)
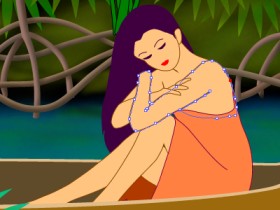
こうやって作った各パーツを、ベジエ曲線として編集しながら形を整えていきます。
I adjusted the shape of each part created in this way by editing them as Bézier curves.

今選択しているのは左腕のパーツです。ポイントの取り方があまり良くないかもしれません。もう少し少ないポイントで形作ったほうが、簡単にきれいな形ができると思います。
この段階では、各パーツの形がわかるように輪郭線をつけています。
The part selected here is the left arm part. The placement of the points may not be very good. I think it would be easier to create a better shape by using fewer points.
At this stage, I added outlines to make the shapes of each part stand out.
I adjusted the shape of each part created in this way by editing them as Bézier curves.

今選択しているのは左腕のパーツです。ポイントの取り方があまり良くないかもしれません。もう少し少ないポイントで形作ったほうが、簡単にきれいな形ができると思います。
この段階では、各パーツの形がわかるように輪郭線をつけています。
The part selected here is the left arm part. The placement of the points may not be very good. I think it would be easier to create a better shape by using fewer points.
At this stage, I added outlines to make the shapes of each part stand out.

(c)
次に彩色します。
Next, color them.

彩色するためには、シェイプスをフローターに変換する必要があります。輪郭線のあるシェイプスからは、輪郭のフローターと、塗りつぶし部分のフローターがそれぞれ別にできます。
ベジエ曲線で作った形は、フローター上のマスクとなりますので、形を維持しながら、かなり自由に色を塗ることができます。
ここでは主にエアブラシのThin Strokeを使って彩色しています。細かい部分はFeather Tipを使っています。
In order to color, we need to convert the shapes to floaters. Shapes with outlines are converted to floaters for outlines and floaters for filled areas separately.
These filled areas act as masks on the floaters, so we can color them fairly freely while maintaining the shape.
In this example, I mainly used the Thin Stroke of the Airbrush tool to color. For fine details I also used Feather Tip.
Next, color them.

彩色するためには、シェイプスをフローターに変換する必要があります。輪郭線のあるシェイプスからは、輪郭のフローターと、塗りつぶし部分のフローターがそれぞれ別にできます。
ベジエ曲線で作った形は、フローター上のマスクとなりますので、形を維持しながら、かなり自由に色を塗ることができます。
ここでは主にエアブラシのThin Strokeを使って彩色しています。細かい部分はFeather Tipを使っています。
In order to color, we need to convert the shapes to floaters. Shapes with outlines are converted to floaters for outlines and floaters for filled areas separately.
These filled areas act as masks on the floaters, so we can color them fairly freely while maintaining the shape.
In this example, I mainly used the Thin Stroke of the Airbrush tool to color. For fine details I also used Feather Tip.

(d)
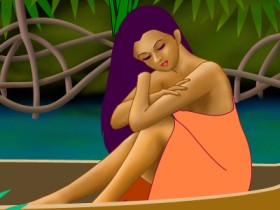
さらに描き込みます。最終的に輪郭線は必要無くなったので、消してしまいました。
Continue to paint. In the end, the outlines wer no longer needed, so I deleted them.

Continue to paint. In the end, the outlines wer no longer needed, so I deleted them.
