ペインターで描くパステル画は、まるで本物の紙に描いたような気分が出せるのが面白いです。
パステル画の場合、まず紙を作るところから始めると良いです。
使用ソフト:Fractal Design Painter 5.0.3
Pastel drawings made with Painter are interesting because they give the feeling of drawing on real paper.
For pastel drawings, it is best to start by creating a piece of paper.
Software used: Fractal Design Painter 5.0.3
(1) 紙を作る Create a piece of paper
パステル画を描く場合、白い紙でなく、中間色の紙を使って、紙の色を生かして描く方法があります。そうすると、紙の色よりも明るいハイライトの部分が映えた感じの絵になります。
When drawing pastel paintings, there is a way to use neutral colored paper instead of white paper to bring out the color of the paper. This will make the highlights stand out, which are brighter than the color of the paper.
まず[File]-[New...]のダイアログで、紙の色を指定して、新しい画像を作ります。
First, in the [File]-[New...] dialog, specify the paper color and create a new image.

紙のテクスチャーは、格子状の模様の付く、"Ribbed Pastel"を選び、スケールは100%にしました。このままでは非常に荒いテクスチャーが付きますが、最終的には画像を50%に縮小する予定なので、このままにしましたが、縮小しない場合は、スケールを50%くらいにすると良いと思います。
For the paper texture, I chose "Ribbed Pastel", which has a grid pattern, and set the scale to 100%. As it is, it will have a very rough texture, but I was planning to scale the image to 50% in the end, so I left it as is. If you do not reduce the image, I think it is better to reduce the scale of the texture to about 50%.

次に、[Effects]-[Surface Control]-[Apply Surface Texture...]で、紙にテクスチャーを付けます。
ほとんどのパラメーターはデフォルトのままでいいと思いますが、テクスチャーが強すぎるので、"Amount"を40%まで減らしています。
Next, add texture to the paper using [Effects]-[Surface Control]-[Apply Surface Texture...].
I think you can leave most of the parameters at their defaults, but the texture is too strong, so I reduced the "Amount" to 40%.

(2) 絵を描く Draw picture
あとはひたすら描くのみです。
私の場合、パステル画では、"Artist Pastel Chalk"というブラシだけを使っています。
ブラシのサイズは、細かい部分は5、広い面積を塗る場合は20くらいにしてます。
All that's left to do is draw.
In my case, I only use the "Artist Pastel Chalk" brush for pastel drawings.
I use a brush size of 5 for fine details and 20 for painting large areas.

また、Grainの値を変えると、パステルの乗りが変わります。
筆圧によっても異なりますが、下の図は、左からそれぞれGrainの値を 10%, 23%, 50% に変えた場合です。
Also, changing the Grain value will change the amount of pastel applied.
It depends on the pen pressure, but the image below shows when the Grain value is changed to 10%, 23%, and 50% from the left.

(3) 消しゴム Eraser
テクスチャーのある紙に描いた絵を、普通の消しゴムを使って消すと、紙のテクスチャーまで消えてしまいます。
その場合の良い方法として、クローンブラシを消しゴム代わりに使うことが出来ます。
まず描いている絵とまったく同じ紙をもう一枚用意して、そのファイルを開いておきます。そしてその画像をクローンソースに指定しておけば、紙のテクスチャーで上塗りすることによって消すことが出来ます。
If you use a ordinary eraser to erase a picture drawn on textured paper, the texture of the paper will also be erased.
A good way to do this is to use the clone brush as an eraser.
First, prepare another sheet of paper that is exactly the same as the picture you are drawing, and open that file. If you specify that image as the clone source, you can erase it by overpainting it with the paper texture.
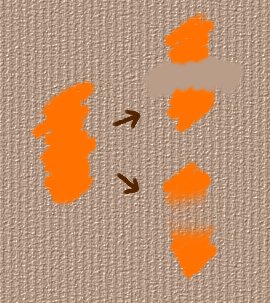
上の図のオレンジの部分の真中あたりを消すとして、右側の上がSmall Eraserを使った場合、右側の下がSoft Clonerを使った場合です。
実際のパステル画ではこんなにきれいに消すことは出来ないので、これは結構ずるいかもです。
In the image above, if you want to erase the middle part of the area painted in orange, the upper right side is when Small Eraser is used, and the lower right side is when Soft Cloner is used.
In actual pastel drawings, it is not possible to erase so clearly, so this may be a great benefit.
(4) 描画の過程 Drawing process
私の場合、実際の描画はこんな感じです。取り立てて芸の無い描き方ですいませんです。
In my case, the actual drawing looks like this. I'm sorry for the particularly uncharacteristic drawing style.
|
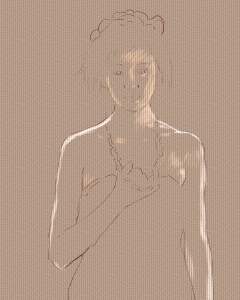
まずざっと当たり程度の下描きを描きます。 次に、ハイライトとなる部分に明るい色を入れ、全体のおおざっぱな形を作ります。 First, draw a rough sketch. Next, add a bright color to the highlighted areas and create a rough overall shape. |
|
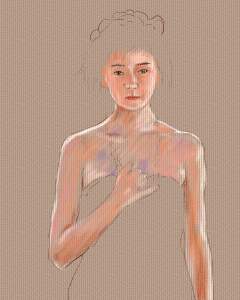
適当に色を乗せます。 Add colors appropriately. |
|
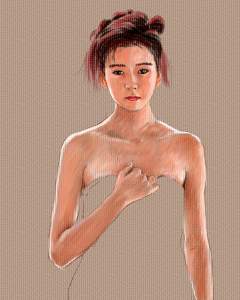
さらに描き込んでいきます。 Continue to draw more. |
こうやってひたすら描いて、出来あがりはこれです。
After drawing like this, this is the finished product.
習作No.28 Study No.28
この絵は、960x1200のサイズで製作して、展示用には480x600のサイズに縮小しています。
This painting was created at a size of 960x1200 and reduced to a size of 480x600 for exhibition purposes.